Battle of Jutland
2007 Schools Wikipedia Selection. Related subjects: Military History and War
| Battle of Jutland | |||||||
|---|---|---|---|---|---|---|---|
| Part of World War I | |||||||
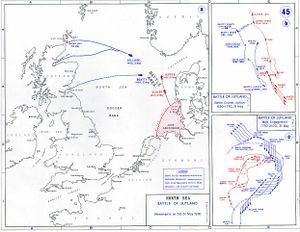 The Battle of Jutland, 1916 |
|||||||
|
|||||||
| Combatants | |||||||
|
Royal Navy ( Grand Fleet) |
Kaiserliche Marine ( High Seas Fleet) |
||||||
| Commanders | |||||||
| Sir John Jellicoe, Sir David Beatty |
Reinhard Scheer, Franz von Hipper |
||||||
| Strength | |||||||
| 28 battleships, 9 battlecruisers, 8 heavy cruisers, 26 light cruisers, 78 destroyers, 1 minelayer, 1 seaplane carrier |
16 battleships, 5 battlecruisers, 6 pre-dreadnoughts, 11 light cruisers, 61 torpedo-boats |
||||||
| Casualties | |||||||
| 6,094 killed 510 wounded 177 captured 3 battlecruisers 3 armoured cruisers 8 destroyers (115,025 tons sunk) |
2,551 killed 507 wounded 1 battlecruiser 1 pre-dreadnought 4 light cruisers 5 torpedo-boats (61,180 tons sunk) |
||||||
| North Sea 1914-1918 |
|---|
| 1st Heligoland Bight – Dogger Bank – Jutland – 2nd Heligoland Bight |
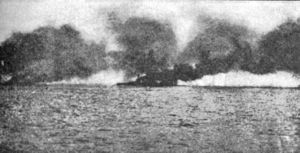
The Battle of Jutland (German: Skagerrakschlacht ( Battle of the Skagerrak); Danish: Søslaget ved Jylland / Søslaget om Skagerrak), was the largest naval battle of World War I, and the only full-scale clash of battleships in that war. It was fought on May 31– June 1, 1916, in the North Sea near Jutland, the mainland of Denmark. The combatants were the Kaiserliche Marine’s High Seas Fleet commanded by Vice Admiral Reinhard Scheer and the Royal Navy’s Grand Fleet commanded by Admiral of the Fleet Sir John Jellicoe. The intention of the German fleet was to break the British naval blockade of the North Sea and allow German mercantile shipping to operate again.
The Germans plan was to use Vice Admiral Franz Hipper’s scouting group of five modern battlecruisers to lure Vice Admiral Sir David Beatty’s battlecruiser squadrons into the path of the main German battle fleet and so destroy them. But the British had learned from signal intercepts (the British had been given a German codebook from the light cruiser SMS Magdeburg, boarded by Russian naval officers after the ship ran aground in Russian territorial waters) that a major fleet operation was likely, and on 30 May Jellicoe sailed with the Grand Fleet to rendezvous with Beatty.
On the afternoon of 31 May, Beatty and Hipper encountered each other, and in a running battle to the south Hipper drew the British into the path of the High Seas Fleet. Beatty turned and fled towards the Grand Fleet and from 18:30 until nightfall at about 20:30 the two huge fleets — totaling 250 ships between them — were heavily engaged. Fourteen British and eleven German ships were sunk with great loss of life. Jellicoe tried to cut the Germans off from their base in the hope of continuing the battle in the morning, but under cover of darkness Scheer crossed the wake of the British fleet and returned to port.
Both sides claimed victory. The British had lost more ships and many more sailors, but Scheer’s plan of destroying Beatty’s squadrons had failed. The Germans continued to pose a threat that required the British to keep their battleships concentrated in the North Sea, but they never again contested control of the seas. Instead, the German Navy turned its efforts and resources to unrestricted submarine warfare.
Background
Naval tactics in 1916
Tactics called for a fleet approaching battle to be in parallel columns moving in-line ahead, allowing relatively easy maneuvering. Several short columns could change their heading faster than a single long column while maintaining formation. Also signals made with flags or searchlights from the flagship (usually placed at the head of the centre column) could be seen by many ships. In single-column formations a signal could take 10 minutes or more to be passed from the flagship at the front of the column to the last ship at the end, since smoke from the funnels often made it impossible to identify signals on ships beyond the one directly ahead or behind, so every ship had to repeat the signal for the following one to understand. The time required for this was often doubled as most signals had to be confirmed by every ship before they could be executed.
For the actual battle the fleet would deploy into a single column by the leading ships of the columns turning 90 degrees to port or starboard, the remaining ships following their leaders in succession, the column being formed at right angles to the original line of advance. To form the column into the right direction the fleet had to know from which direction the enemy was approaching before he could be seen by the battleships, as this maneuver took longer than two fleets heading towards each other at high speed needed to come within fighting range. It was the task of the scouting forces, consisting of battlecruisers and cruisers, to find the enemy and report from where he approached in time and if possible deny the enemy's scouting force to obtain the same information.
Ideally the line of battleships would cross the path of the enemy column so that the maximum number of guns could be brought to bear, while the enemy could only fire with the front turrets of the leading ships. Carrying out this classic manoeuvre of " crossing the T" was largely a matter of luck; more common were heavy exchanges between two fleets on roughly parallel courses.
German plan
The German naval strategy, according to Scheer, was:
- to damage the English Fleet by offensive raids against the naval forces engaged in watching and blockading the German Bight, as well as by mine-laying on the British coast and submarine attack, whenever possible. After an equality of strength had been realised as a result of these operations, and all our forces had been got ready and concentrated, an attempt was to be made with our fleet to seek battle under circumstances unfavourable to the enemy.
Since in 1916 the German High Seas Fleet had only 18 battleships to the British Grand Fleet's 33 and the Germans were falling increasingly further behind as the war progressed, there was no chance of defeating the British in a head-to-head clash of battleships. Instead, they planned to divide and conquer: by staging raids into the North Sea they would lure out small British squadrons which could then be attacked and destroyed. Since the British Admiralty, unknown to the Germans, had gained possession of the main German code books, German naval radio communications picked up could be deciphered, and the Admiralty was therefore usually quite well aware of German plans.
The plan for May 1916 was to station a large number of U-boats off the British naval bases and lure Beatty's battlecruiser squadrons out by sending a fleet under Hipper to raid the coast of Sunderland. After attrition from the submarines, the British would be drawn by Hipper towards the German dreadnoughts under Scheer and destroyed.
British response
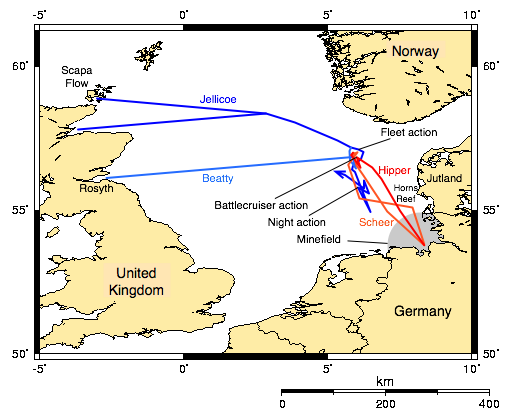
The British intercepted and decrypted a German signal on 28 May ordering all ships to be ready to put to sea on the 30th. Further signals were intercepted and although they were not decrypted it was clear that a major operation was likely. The Grand Fleet of twenty-four dreadnoughts and three battlecruisers left Scapa Flow under Jellicoe before Hipper left the Jade Estuary on 30 May. Beatty's force of four dreadnoughts and six battlecruisers left the Firth of Forth on the next day, and Jellicoe's intention was to rendezvous ninety miles (145 km) west of the Skagerrak off the coast of Jutland and wait for the Germans.
Order of battle
See Order of battle at Jutland.
The fleets
Jellicoe's battle force was twenty-eight dreadnoughts and nine battlecruisers, while Scheer had sixteen dreadnoughts, five battlecruisers and six obsolete pre-dreadnoughts. The British were superior in light vessels as well. In terms of weight of broadside the British had an advantage of 332,400 lb (151 tonnes) against 134,000 lb (61 tonnes).
This British superiority was countered by certain technical factors: German ships had thicker armour against torpedo attack; German ships had better internal sub-division because they were only designed for short cruises in the North Sea and their crews lived in barracks ashore when in harbour; German armour-piercing shells were more effective than the British shells; and, vitally important, the British cordite propellant was oversensitive, and the British magazines were not well protected. Further, the German Zeiss optical equipment was superior.
The Admirals
- See the respective article of each admiral:
The battlecruiser action
The German U-boats were completely ineffective; they did not sink a single ship and provided no useful information as scouts. Jellicoe's ships proceeded to his rendezvous undamaged but misled by Admiralty intelligence that the Germans were nine hours later than they actually were.
At 14:20 on 31 May, scouts from Beatty's force reported enemy ships to the south-east: British light units, investigating a neutral Danish steamer which was sailing between the two fleets, found German scouts engaged in the same mission. Beatty moved to cut the German ships off from their base. The first shots of the battle were fired when Galatea of the British 1st Light Cruiser Squadron mistook two German destroyers for cruisers and engaged them. Galatea was subsequently hit at extreme range by her German counterpart, Elbing, of Rear Admiral Bodicker's Scouting Group II.
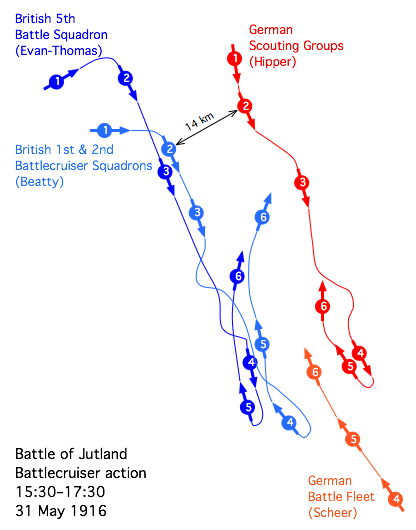
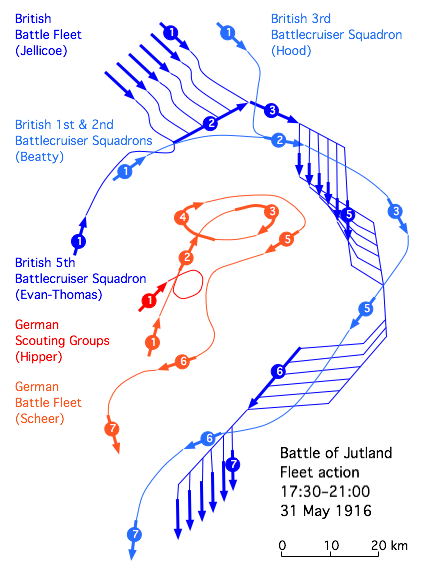
At 15:30, Beatty sighted Hipper's cruisers moving north-west (position 1 on map). Hipper promptly turned away to lead Beatty towards Scheer. Beatty, some three miles (5 km) from Rear-Admiral Sir Hugh Evan-Thomas's 5th Battle Squadron, turned to the enemy and signalled by flag for the 5th Battle Squadron to follow. Given the distance and visibility, the 5th could not read the flag signals; and as Beatty made no effort to communicate via light signal or radio telegraph, the 5th continued on its original course for several minutes. At 15:45, after having the German ships within range for over ten minutes, and with both fleets roughly parallel at 15,000 yards (14 km), Hipper opened fire followed by Beatty (position 2). Thus began the opening phase of the fleet action, known as the "Run to the South".
Beatty ordered his ships to engage in a line, one British ship engaging with one German and his flagship Lion doubling on the German flagship Lützow. However, due to a mistake on the British part, Derfflinger was left unengaged and free to fire without disruption, while Moltke drew fire from two battlecruisers. The Germans drew first blood. Hipper's five battlecruisers promptly registered hits on three of the six British battlecruisers. Nearly 10 minutes passed before the British managed to score their first hit. The first near-disaster of the battle occurred when a 12 inch (305 mm) salvo from Lützow wrecked "Q" turret of Beatty's flagship Lion. Dozens of crewmen were instantly killed, but a far larger catastrophe was averted when Major Francis Harvey of the Royal Marines, the mortally wounded turret commander, ordered the magazine doors shut and the magazine flooded, thereby preventing the fickle propellant from setting off a massive explosion. Lion was saved, but Indefatigable was not so lucky. At 16:00 she was smashed aft by three 11 inch (280 mm) shells from Von der Tann, causing damage sufficient to knock her out of line. Von der Tann landed another 11 inch (280 mm) salvo on one of her 12 inch (305 mm) turrets at near-maximum range. The plunging shells easily pierced the armour and, with no time for the heroics that saved Lion, Indefatigable was ripped apart by a magazine explosion, sinking in moments with all but two of her crew of 1,019 officers and men (position 3).
The odds had been evened to Hipper's benefit, but not for long. Evan-Thomas had finally brought up his squadron of four "super-dreadnoughts" — fast battleships of the Queen Elizabeth class armed with 15 inch (381 mm) guns. With 15 inch (381 mm) shells landing on his ships and unable to respond effectively at long range with his smaller guns, Hipper was in a tight spot, but he knew Scheer's main body was fast approaching and his baiting mission was close to completion. The battlecruiser action intensified again: at 16:25 Queen Mary was hit by what may have been a combined salvo from Derfflinger and Seydlitz, and she disintegrated in a magazine explosion with all but nine of her 1,275 man crew lost.
Shortly after, a salvo struck on or about the Princess Royal, which disappeared in spray and smoke. A signalman leapt to the bridge of the Lion, "Princess Royal blown up, sir." Beatty famously turned to his flag captain, "Chatfield, there seems to be something wrong with our bloody ships today. Turn two-points to port," i.e. two points nearer the enemy (position 4).
At about 16:30, the Southampton of Beatty's 2nd Light Cruiser Squadron led by Commodore William Goodenough sighted the main body of Scheer's High Seas Fleet, dodging numerous heavy-calibre salvos to report the detailed strength of the Germans: sixteen dreadnoughts with six older battleships. Simultaneously a destroyer action raged between the battlecruiser fleets, as British destroyers meleed with their German counterparts and managed to put a torpedo into Seydlitz. The destroyer Nestor, under the command of Captain Bingham, sank two German torpedo boats, the V-27 and the V-29, before she and another destroyer, the Nomad, were immobilized by hits and later sunk by Scheer's dreadnoughts.
Beatty headed north to draw the Germans towards Jellicoe and broke contact with the Germans at about 16.45 (position 5). Beatty's move towards Jellicoe is called the "Run to the North". Because Beatty once again failed to signal his intentions adequately, the super-dreadnoughts of the 5th Battle Squadron found themselves lagging behind the battlecruisers and heading directly into the main body of the High Seas Fleet.Their difficulty was compounded by Evan-Thomas, who gave the order to "turn in succession" rather than "turn together". This resulted in all four ships turning, in succession, in the same patch of sea, for which the High Seas Fleet had ample time to find the range. For a period they had to fend off the lead German dreadnoughts and Hipper's battlecruisers on their own. Malaya sustained heavy casualties in the process, lessened by the initiative of the Captain in turning early; the 15 inch (381 mm) fire of the British ships remained effective, causing severe damage to the German battlecruisers (position 6).
Jellicoe was now aware that full fleet engagement was nearing, but had insufficient information on the position and course of the Germans. Rear Admiral Horace Hood's 3rd Battlecruiser Squadron was ordered to speed ahead to assist Beatty, while Rear-Admiral Arbuthnot's 1st Cruiser Squadron patrolled the van of the main body for eventual deployment of Jellicoe's dreadnought columns. Around 17:30 the cruiser Black Prince of Arbuthnot's squadron, bearing southeast, came within view of Beatty's leading 3rd Light Cruiser Squadron, establishing the first visual link between the converging bodies of the Grand Fleet. Simultaneously the signals cruiser Chester, steaming behind Hood's battlecruisers, was intercepted by the van of the German scouting forces under Rear-Admiral Bodicker. Heavily outnumbered by Bodicker's four light cruisers, Chester was pounded before being relieved by Hood's heavy units which swung back westward for that purpose. Hood's flagship Invincible disabled the light cruiser Wiesbaden as Bodicker's other ships fled toward Hipper and Scheer, in the mistaken belief that Hood was leading a larger force of British capital ships from the north and east. Another destroyer action ensued as German torpedo boats attempted to blunt the arrival of this new formation.
The fleet action
In the meantime Beatty and Evan-Thomas had resumed their engagement of Hipper's battlecruisers, this time with the visual conditions to their advantage. With several of his ships damaged, Hipper turned back to Scheer around 18.00, just as Beatty's flagship Lion was finally spotted by Jellicoe on the Iron Duke. Jellicoe promptly demanded the latest position of the German forces from Beatty, who failed to respond to the question for almost ten minutes.
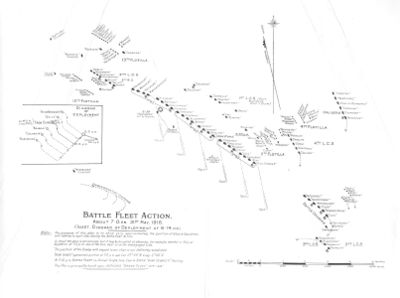
Jellicoe, having overestimated the enemy forces, was in a worrying position, needing to know the position of the Germans in order to judge when and how to deploy his battleships from their cruising formation in column into a single battle line. The deployment could be onto either the western or the eastern column and had to be carried out before the Germans arrived; but early deployment could mean losing any chance of a decisive encounter. Deploying to the west would bring his fleet closer to Scheer, gaining valuable time as dusk approached, but the Germans might arrive before the manoeuvre was complete. Deploying to the east would take the force away from Scheer, but Jellicoe's ships might be able to cross the "T" and would have the advantage of silhouetting Scheer's forces against the setting sun to the west. Deployment would take twenty irreplaceable minutes, and the fleets were closing at speed. Jellicoe ordered deployment to the east at 18:10 ❷.
Meanwhile Hipper had rejoined Scheer, and the combined High Seas Fleet was heading north, directly toward Jellicoe. Scheer had no indication that Jellicoe was at sea, let alone that he was bearing down from the northwest, and was distracted by the intervention of Hood's ships to his north and east. Beatty's four surviving battlecruisers were now crossing the van of the British dreadnoughts to join Hood's three battlecruisers; in doing so, Beatty nearly rammed Rear-Admiral Arbuthnot's flagship Defence.
Arbuthnot's obsolete armoured cruisers had no real place in the coming clash between modern dreadnoughts, but he was attracted by the drifting hull of the crippled Wiesbaden. With Warrior, Defence closed in for the kill, only to blunder right into the gunsights of Hipper's and Scheer's oncoming capital ships. Defence was destroyed in a spectacular explosion viewed by most of the deploying Grand Fleet, sinking with all hands (903 officers and men). Warrior was hit badly but spared immolation by the mishap of the nearby superdreadnought Warspite. Warspite had been steaming near 25 knots (46 km/h) to keep pace with the 5th Battle Squadron as it tailed Beatty's battlecruisers in the run north, creating enough strain to jam her rudder. Drifting in a wide circle, she appeared as a juicy target to the German dreadnoughts and took thirteen hits, inadvertently drawing fire from the hapless Warrior. This maneouvre from Warspite was known as "Windy Corner". Despite surviving the onslaught, Warspite was soon ordered back to port by Evan-Thomas.
As Defence sank, Hipper moved within range of Hood's 3rd Battlecruiser Squadron. Invincible inflicted two below-waterline hits on Lützow that would ultimately doom Hipper's flagship, but at about 18:30 abruptly appeared as a clear target before Lützow and Derfflinger. A series of 12 inch (305 mm) shells struck Invincible, which blew up and split in two, killing all but six of her crew of 1,032 officers and men, including Rear Admiral Hood.
By 18:30 the main fleet action was joined for the first time, with Jellicoe effectively "crossing Scheer's T" ❸. Jellicoe's flagship Iron Duke quickly scored a series of hits on the lead German dreadnought, König, but in this brief exchange, which lasted only minutes, as few as ten of the Grand Fleet's twenty-four dreadnoughts actually opened fire. The Germans were hampered by poor visibility in addition to being in an unfavourable tactical position. Realizing he was heading into a trap, Scheer ordered his fleet to turn and flee at 18:33. Amid a pall of smoke and mist Scheer's forces succeeded in disengaging.
Conscious of the risks to his capital ships posed by torpedoes, Jellicoe did not chase directly but headed south, determined to keep the High Seas Fleet west of him. Scheer knew that it was not yet dark enough to escape and his fleet would suffer terribly in a stern chase, so at 18:55 he doubled back to the east ❹. In his memoirs he wrote, "the manoeuvre would be bound to surprise the enemy, to upset his plans for the rest of the day, and if the blow fell heavily it would facilitate the breaking loose at night." But the turn to the east took his ships towards Jellicoe's.
Commodore Goodenough's 2nd Light Cruiser Squadron dodged the fire of German battleships for a second time to reestablish contact with the High Seas Fleet shortly after 19:00. By 19:15, Jellicoe had crossed the "T" yet again ❺. This time his arc of fire was tighter and deadlier, causing severe damage to the Germans, particularly Rear-Admiral Behncke's leading 3rd Battle Squadron. At 19:17, for the second time in less than an hour, Scheer turned to the west, ordering a major torpedo attack by his destroyers and a "death ride" by Scouting Group I's four remaining battlecruisers — Lützow being out of action and abandoned by Hipper — to deter a British chase. In this portion of the engagement the Germans sustained thirty-seven heavy hits while inflicting only two, Derfflinger alone receiving fourteen. Nonetheless Scheer slipped away as sunset (at 20:24) approached. The last major engagement between capital ships took place as the surviving British battlecruisers caught up with their German counterparts, which were briefly relieved by Rear-Admiral Mauve's obsolete pre-dreadnoughts ❻. As King George V and Westfalen exchanged a few final shots, neither side could have imagined that the only encounter between British and German dreadnoughts in the entire war was already concluded.
At 21:00, Jellicoe, knowing of the Grand Fleet's deficiencies in night-fighting, decided to try to avoid a major engagement until early dawn. He placed a screen of cruisers and destroyers behind his battle fleet to patrol the rear as he headed south to guard against Scheer's expected escape to Ems ❼. In reality Scheer opted to cross Jellicoe's wake and escape via Horns Reef. Luckily for Scheer, Jellicoe's scouts failed to report his true course while Jellicoe himself was too cautious to judge from extensive circumstantial evidence that the Germans were breaking through his rear.
While the nature of Scheer's escape and Jellicoe's inaction indicate the overall superiority of German night-fighting proficiency, the night's results were no more clear-cut than the battle as a whole. Southampton, Commodore Goodenough's flagship which had scouted so proficiently, was heavily damaged but managed to sink the German light cruiser Frauenlob which went down at 22:23 with all hands (320 officers and men). But at 02:00 on 1 June, Black Prince of the ill-fated 1st Cruiser Squadron met a grim fate at the hands of the battleship Thüringen, blowing up with all hands (857 officers and men) as her squadron leader Defence had done hours earlier. At 02:10, several British destroyer flotillas launched a torpedo attack on the German battlefleet. At the cost of five destroyers sunk and some others damaged, they managed to sink the predreadnought Pommern with all hands (844 officers and men), as well as to torpedo the light cruiser Rostock and causing another, Elbing, to be rammed by the dreadnought Posen and abandoned. The battlecruiser Lützow was torpedoed at 01:45 on orders of her captain (von Harder) by the destroyer G38 after the surviving crew of 1,150 transferred to destroyers that came alongside.
The Germans were helped in their escape by the failure of British naval intelligence in London to relay a critical radio intercept giving the true position of the High Seas Fleet. By the time Jellicoe finally learned of Scheer's whereabouts at 04:15 it was clear the battle could no longer be resumed. There would be no " Glorious First of June" in 1916.
The outcome
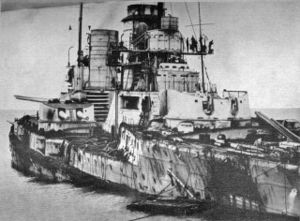
At Jutland, 99 German ships sank 115,000 tons of British metal, while 151 British ships sank 62,000 tons of German steel. The British lost 6,094 seamen, the Germans 2,551. Several other ships were badly damaged, such as HMS Lion and SMS Seydlitz. At the end of the battle the British had maintained their numerical superiority and had twenty-four dreadnoughts and battlecruisers still able and ready to fight while the Germans had ten.
For the British, the outcome was a marginal tactical gain. Although they had lost more ships and had not destroyed the German fleet as intended, the Germans had retreated to port and the British were in command of the area. At a strategic level the outcome was more clear cut. The damaged British ships were restored to operational use more quickly than the German ships. However, the High Seas Fleet remained active and its presence as a fleet in being prevented a complete blockade of Germany. Nevertheless the Germans showed superior fighting power when taking into consideration their much smaller force.
The British examination of their performance identified two main problems:
- Their armour-piercing shells exploded outside the German armour rather than penetrating and exploding within. As a result some German ships with only 8 inch (203 mm) armour survived hits from 15 inch (381 mm) shells. Had these shells performed to design, German losses would probably have been greater.
- Communication between ships and the British commander-in-chief were poor. For most of the battle Jellicoe had no idea where the German ships were, even though British ships were in contact. They failed to report positions contrary to the Grand Fleet Battle Plan. Some of the signalling was carried out by flag instead of wireless — a questionable procedure given the mixture of haze and smoke that obscured the battlefield.
Battlecruiser design and handling
The weak design and faulty use of the battlecruisers were important in the serious losses of the British. The battle is often regarded as demonstrating that the Royal Navy was technologically and operationally inferior to the German Navy. Jellicoe wrote in his dispatch:
- "The disturbing feature of the battle-cruiser action is the fact that five German battle-cruisers engaging six British vessels of this class, supported after the first twenty minutes, although at great range, by the fire of four battleships of the "Queen Elizabeth" class, were yet able to sink Queen Mary and Indefatigable … The facts which contributed to the British losses were, first, the indifferent armour protection of our battle-cruisers, particularly as regards turret armour and deck plating, and, second, the disadvantage under which our vessels laboured in regard to the light … The German organisation at night is very good. Their system of recognition signals is excellent. Ours is practically nil. Their searchlights are superior to ours and they use them with great effect. Finally, their method of firing at night gives excellent results. I am reluctantly compelled to the opinion that under night conditions we have a good deal to learn from them".
During the summer of 2003, a diving expedition examined the wrecks of Invincible, Queen Mary, Defence, and Lützow to investigate the cause of the British ships' tendency to suffer from internal explosions. On this evidence, a major part of the blame may be laid on lax handling of the cordite propellant for the shells of the main guns. This, in turn, was a product of current British naval doctrine, which emphasised a rapid rate of fire in the direction of the enemy rather than slower, more accurate fire. In practice, the cordite could not be supplied to the guns rapidly enough through the hoists and hatches; in order to bring up the propellant for the next broadside before the time when it had to be loaded, many safety doors which should have been kept shut to safeguard against flash fires were open. Furthermore, whereas the German propellant RP C/12 was supplied in brass cylinders, British cordite was supplied in silk bags, making it more susceptible to flash fires. The doctrine of a high rate of fire also led to the decision in 1913 to increase the supply of shells and cordite held on the British ships by 50 per cent, for fear of running out of ammunition; when this caused the capacity of the ships' magazines to be exceeded, cordite was stored in insecure places (Lambert, 36).
The memoirs of Alexander Grant, gunner on Lion, show that some British officers were well aware of the dangers of careless handling of cordite:
- "With the introduction of cordite to replace powder for firing guns, regulations regarding the necessary precautions for handling explosives became unconsciously considerably relaxed, even I regret to say, to a dangerous degree throughout the Service. The gradual lapse in the regulations on board ship seemed to be due to two factors. First, cordite is a much safer explosive to handle than gun-powder. Second, but more important, the altered construction of the magazines on board led to a feeling of false security … The iron or steel deck, the disappearance of the wood lining, the electric lights fitted inside, the steel doors, open because there was now no chute for passing cartridges out; all this gave officers and men a comparative easiness of mind regarding the precautions necessary with explosive material".
After the battle the Admiralty produced a report critical of the cordite handling practices. By this time, however, Jellicoe had been promoted to First Sea Lord and Beatty to command of the Grand Fleet; the report, which indirectly placed part of the blame for the disaster on the fleet's officers, was suppressed.
The battle showed that the British concept and use of the battlecruiser was wholly flawed. The battlecruiser had been designed according to Jackie Fisher's dictum that "speed is armour". They were intended to be faster than battleships, with superior fire control, and able to pound enemy cruisers at ranges at which the enemy could not reply. Indeed, the whole concept was negated when British battlecruisers were asked to fight German ships which were just as fast, and better armoured.
The Jellicoe controversy
At the time Jellicoe was criticised for his caution and for allowing Scheer to escape. Beatty in particular was convinced that Jellicoe had missed a tremendous opportunity to win another Trafalgar and annihilate the High Seas Fleet. Jellicoe's career stagnated; he was promoted away from active command to become First Sea Lord, while Beatty replaced him as commander of the British Grand Fleet.
The controversy raged within the navy for about a decade after the war. Criticism focused on Jellicoe's decision at 19:15. Scheer had ordered his cruisers and destroyers forward in a torpedo attack to cover the turning away of his battleships. Jellicoe chose to turn away to the southeast and so keep out of range of the torpedoes. If Jellicoe had instead turned to the west, could his ships have dodged the torpedoes and destroyed the German fleet? Supporters of Jellicoe, including the naval historian Julian Corbett, pointed out the folly of risking defeat in battle when you already have command of the sea. Jellicoe himself, in a letter to the Admiralty before the battle, had stated that in the event of a fleet engagement in which the enemy turned away he would assume that the intention was to draw him over mines or submarines and would decline to be so drawn. This appreciation was at the time accepted by the Admiralty. (Corbett's volume of the official history of the war, Naval Operations, contains the extraordinary disclaimer, "Their Lordships find that some of the principles advocated in the book, especially the tendency to minimise the importance of seeking battle and forcing it to a conclusion, are directly in conflict with their views.")
Whatever one thinks of the result, it is true that the stakes were very high, the pressure on Jellicoe was immense, and his caution is certainly understandable - his judgment might have been that even 90% odds in favour were not good enough on which to bet the British Empire. The former First Lord of the Admiralty Winston Churchill, said of the battle that Jellicoe "was the only man on either side who could have lost the war in an afternoon." The criticism of Jellicoe also fails to give enough credit to Scheer, who was determined to preserve his fleet by avoiding a decisive engagement, and showed great skill in effecting his escape.
Beatty's actions
Another school of thought condemns the actions of Admiral Beatty for the failure of a complete British victory. Although Beatty was undeniably a brave man, his encounter with the High Seas Fleet almost cost the British the battle. Most of the British losses in tonnage occurred in Beatty's squadron. The three capital ships the British lost that day were all under the command of Beatty.
Beatty's lack of control over the battlecruiser action is often criticised. He failed to provide Jellicoe with precise information on the whereabouts of the High Seas Fleet. Beatty did not apparently appreciate the finer points of command and control over a naval engagement, or the potential weaknesses of his own ships. Beatty, aboard the battlecruiser Lion, repeatedly overlooked the four fast battleships of the 5th Battle Squadron under his command, engaging with six ships when better control could have given him 10 against Hipper’s five. Despite Beatty's 12" guns having greater range than Hipper's 11" guns, Beatty closed the gap between the opposing squadrons until the Germans' superior gunnery took its toll.
Even his famous remark "There's something wrong with our bloody ships today" could be construed as Beatty seeking to deflect blame away from himself. Despite his poor control of his battlecruisers, his neglect of the 5th Battle Squadron and inadequate battle preparedness, Beatty was fully prepared to lambast Admiral Jellicoe for not being aggressive enough; even though during the course of the battle Beatty, and Admiral Arbuthnot, had shown the folly of charging in for the attack. Jellicoe clearly understood the capabilities of his ships and the risks he faced; it is not clear that Beatty did.
Losses
British
- Battlecruisers Indefatigable, Queen Mary, Invincible
- Armoured cruisers Black Prince, Warrior, Defence
- Flotilla Leaders Tipperary
- Destroyers Shark, Sparrowhawk, Turbulent, Ardent, Fortune, Nomad, Nestor
German
- Battlecruiser Lützow
- Pre-Dreadnought Pommern
- Light cruisers Frauenlob, Elbing, Rostock, Wiesbaden
- (Heavy Torpedo Boats) Destroyers V48, S35, V27, V4, V29
Honours Won at Jutland
Victoria Cross
- The Hon. Edward Barry Stewart Bingham ( HMS Nestor)
- John Travers Cornwell ( HMS Chester)
- Francis John William Harvey ( HMS Lion)
- Loftus William Jones ( HMS Shark)
Protection of the British wrecks
On the 90th anniversary of the battle, in 2006, the Ministry of Defence announced that the 14 British vessels lost in the battle were being designated as protected places under the Protection of Military Remains Act.
Quotations
- "Two short siren blasts rang out over the water as the main battle fleet, steaming in four groups, turned to port to form themselves in a single line of battle--the last line head battle formation in the history of the British navy. Not wooden walls this time, but walls of steel, with streamlined gray hulls instead of gilded stern galleries and figureheads, and funnels belching black smoke instead of sails close-hauled. But it was a formation Blake or Rooke or Rodney would have recognized, and approved. King George V and Ajax were first, followed by Orion, Royal Oak, Iron Duke, Superb, Thunderer, Benbow, Bellerophon, Temeraire, Collingwood, Colossus, Marlborough, St. Vincent -- twenty-seven in all, names redolent with the navy's past [...], names of admirals and generals, Greek heroes and Roman virtues. And all slowly bringing their guns to bear as they steamed into harm's way--just as their predecessors had for so many centuries in exactly the same sea. [...] Scheer's position was dangerous but hardly hopeless. [...] Scheer might have looked to his heavier armor to protect his ships from British shells (many of which were defective and failed to explode), while overpowering theirs with his own faster and more accurate fire. Certainly this was the moment of decisive battle he and Tirpitz had been yearning for. But as Scheer gazed out at the flashing fire along the horizon, he saw something else. He saw before him the entire history of the British navy, a fighting force with an unequalled reputation for invincibility in battle and bravery under fire. "The English fleet," he wrote later, "had the advantage of looking back on a hundred years of proud tradition which must have given every man a sense of superiority based on the great deeds of the past." His own navy's fighting tradition was less than two years old. At that fateful moment, Scheer was confronting not John Jellicoe but the ghosts of Nelson, Howe, Rodney, Drake, and the rest; and he backed down. Arthur Herman, To Rule the Waves: How the British Navy Shaped the Modern World, 2004
- “The High Seas Fleet [of Imperial Germany], developed in only sixteen years, had proved itself able to face the full might and tradition of British seapower and survive. [A variety of grave shortcomings] point to the underlying reason for the shock which Jutland administered to British pride. Already the balance of energy and vigour had begun to shift. Already the leadership in competitive endeavour had crossed the North Sea and was crossing the North Atlantic. In a sector crucial to national survival, the onset of British decline, hidden for a generation behind the splendors of the old order, was revealed. Few recognised the deeper perspectives at the time; most were concerned to argue and explain the foreground event. [. . .] Because it seemed so indecisive, Jutland was sometimes called ‘the battle that was never fought.’ It was in fact one of the more decisive battles of modern history. For it was one of the first clear indications to Britain that the creator had become the curator.” Stuart Legg. Jutland. 1966
Veterans
- Henry Allingham, a British RAF (originally RNAS) airman, is the last living veteran of the Battle of Jutland. He is still alive as of September 6, 2006, aged 110.
